Contents Menu Expand
Logo

Choose your framework or language

Web (React, Angular, etc.) Objective-C Swift Kotlin Java Flutter Ionic React Native
Go to docs
Logo
Logo

Introduction

  • Get started
  • How Alan works
    • Alan basics
    • Alan infrastructure
    • Deployment options
    • Voice processing
  • Alan Studio
    • Alan projects
    • Voice scripts
      • Managing scripts
      • Exporting and importing scripts
      • Sharing and keeping scripts in GitHub
      • Using shortcuts
      • Changing the theme and font size
      • Viewing the script flowchart
    • Versions and environments
    • Testing and debugging
      • Debugging Chat
      • Tools to simulate in-app behavior
      • Test View
      • Alan Studio logs
      • In-app testing
    • Alan Playground
    • Voice analytics
      • Projects dashboard
      • Analytics View
    • Popup editor
    • Billing and subscriptions
  • Alan button
    • Customizing the in-app assistant
    • Setting up cohorts
    • Starting and stopping dialog sessions
  • Supported platforms
  • Recent Alan Platform updates

Server API

  • Script concepts
    • Commands and responses
      • Intent matching
      • Voice settings
    • Patterns
    • Slots
      • User-defined slots (static)
      • Dynamic slots
      • Regex slots
      • Predefined slots
    • Contexts
    • Built-in JavaScript libraries
    • Predefined script objects
    • In-app assistant lifecycle
    • Error handling and re-prompts
    • Alan button popups
  • Sending data from the app
    • authData
    • Visual state
    • Project API
  • User data
    • User events
    • Client object
  • Q&A virtual assistant
  • API reference

Integration

  • Integration overview
  • Web frameworks
    • React
    • Angular
    • Vue
    • Ember
    • JavaScript
    • Electron
    • Cross-platform solutions
    • Server-side rendering
  • iOS
  • Android
  • Cross-platform frameworks
    • Flutter
    • Ionic
      • Ionic React
      • Ionic Angular
      • Ionic Vue
      • iOS and Android deployment
      • Communication between components
      • Troubleshooting
    • React Native
    • Apache Cordova

Alan SDK toolkit

  • Client API methods
  • Alan handlers
    • onCommand handler
    • onButtonState handler
    • onConnectionStatus handler
    • onEvent handler

Samples & Tutorials

  • How-tos
  • Tutorials
    • Web
      • Building a voice assistant for web
      • Creating a voice-enabled food delivery app: complete tutorial
        • Step 1: Create a web app
        • Step 2: Create a voice assistant
        • Step 3: Integrate Alan with the app
        • Step 4: Add a voice command
        • Step 5: Specify options and alternatives
        • Step 6: Pick out important data with slots
        • Step 7: Add several items
        • Step 8: Send a command to display items in the cart
        • Step 9: Use slot labels to display the order
        • Step 10: Remove items with voice
        • Step 11: Highlight named items
        • Step 12: Add the checkout context
        • Step 13: Get the delivery time
        • Step 14: Capture a comment
        • Step 15: Populate fields with the delivery details
        • Step 16: Make an API call to get ingredients
        • Step 17: Get the app visual context
        • Step 18: Get the balance
        • Step 19: Let Alan start the dialog
        • Step 20: Show a popup next to the Alan button
      • Using dynamic slots in patterns
      • Making a Web API call from the voice script
    • Web frameworks
      • Building a voice assistant for a React app
      • Building a voice assistant for an Angular app
      • Building a voice assistant for a Vue app
      • Building a voice assistant for an Ember app
      • Building a voice assistant for an Electron app
    • iOS
      • Building a voice assistant for an iOS app
      • Navigating between views
      • Passing the app state to the voice script
      • Highlighing items with voice
      • Triggering voice script actions without commands
      • Playing a greeting in an app
    • Android
      • Building a voice assistant for an Android Java or Kotlin app
      • Navigating in an Android app with voice (Kotlin)
      • Passing the app state to the voice script (Kotlin)
      • Sending data from the app to the voice script (Kotlin)
    • Flutter
      • Building a voice assistant for a Flutter app
      • Navigating between screens
      • Passing the app state to the voice script
      • Sending data to the voice script
    • Ionic
      • Building a voice assistant for an Ionic Angular app
      • Navigating between tabs (Ionic Angular)
      • Passing the app state to the voice script (Ionic Angular)
      • Building a voice assistant for an Ionic React app
      • Navigating between tabs (Ionic React)
    • React Native
      • Building a voice assistant for a React Native app
      • Sending commands to the app
      • Passing the app state to the voice script
      • Triggering activities without voice commands
      • Navigating between screens with voice
  • App showcase
    • Appointment scheduling app (React)
    • Shrine e-commerce app (Flutter)
    • Food delivery app (Ionic)
    • Order drinks app (Angular)
  • FAQ
  • Alan examples
    • Voice script examples
    • Integration code examples
  • Videos
    • Alan Studio videos
    • Alan Platform videos
    • Integration videos
    • Voice-enabled apps
    • Alan AI Udemy course (web app)
  • Alan cheat sheet
  • Multimodal design guidelines
    • Planning and drafting
    • Building the dialog
    • Testing
    • Preparing for rollout and releasing
    • Analyzing users' behavior

Navigating between views (iOS)

If your iOS app has multiple views, you can add voice commands to navigate between them. In this tutorial, we will add a new view to our starter iOS app and create commands to switch between the app views with voice.

What you will learn

  • How to send commands from the voice script to an iOS app

  • How to handle commands on the iOS app side

  • How to navigate between views in an iOS app with voice

What you will need

To go through this tutorial, make sure you have completed the following tutorial: Building a voice assistant for an iOS Swift app. You can also use an example app provided by Alan: SwiftTutorial.part1.zip. This is an XCode project of the app already integrated with Alan.

Step 1: Add a new view to the app

Note

This step is required if you are using the starter iOS app created in the previous tutorial. You can also use your own app with several views. In this case, skip this step and go to step 2.

In the Building a voice assistant for an iOS Swift app tutorial, we have created an iOS app with a single view, and added the Alan button to it. Let’s add a new view to this app. We will use the Navigation Controller to manage the app views.

  1. In Xcode, open the app’s storyboard: Main.storyboard.

  2. In the storyboard, select the app view by clicking the view dock.

  3. Go to Editor > Embed In > Navigation Controller. The Navigation Controller will be added to the storyboard, and the app view will be linked to it.

  4. Go to View > Show Library to open the Library, find View Controller in it and drag it to the storyboard. Place the added View Controller element to the right of the first View Controller.

  5. From the Library, add a button to the first View Controller and name the button, for example: Show Second View.

  6. Select the button, press and hold the Control key on the keyboard and drag from the button to the second View Controller. In the displayed window, select Show.

  7. Select the created segue and in the Attribute Inspector, in the Identifier field, set the ID for it: goForward. We will use this ID later in this tutorial to switch to the second view with voice.
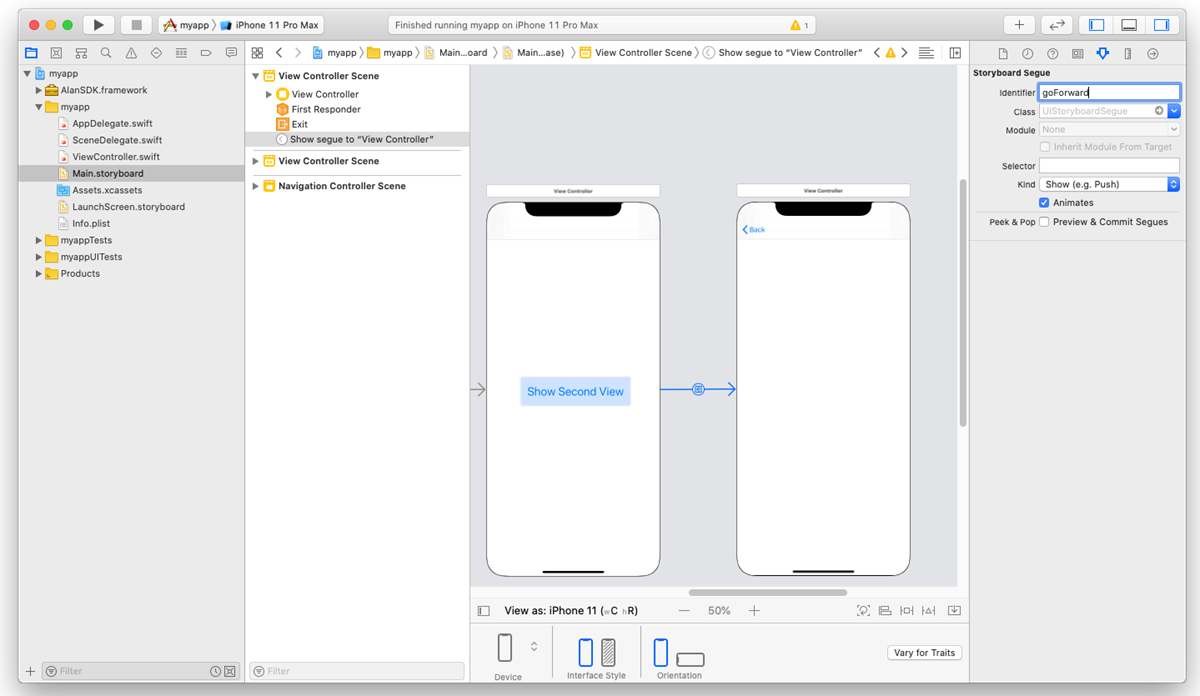
    ../../../_images/xcode-segue.png
  8. Open the ViewController.swift file and replace:

    ViewController.swift
    class ViewController: UIViewController
    

    with

    ViewController.swift
    class ViewController: UINavigationController
    

Run the app. When the app is launched on the simulator, tap the Show Second View button to navigate forward. In the second view, tap the Back button at the top to get back to the initial view.

../../../_images/xcode-storyboard-run.png

Step 2: Add voice commands to navigate between views

We can navigate between views using the app’s UI. Now we need to add new commands to the Alan script to navigate between views with voice. In Alan Studio, open the project and in the code editor, add the following intents:

Voice script
intent(`Navigate forward`, p => {
    p.play({command: 'navigation', route: 'forward'});
    p.play(`Navigating forward`);
});

intent(`Go back`, p => {
    p.play({command: 'navigation', route: 'back'});
    p.play(`Going back`);
});

Now, when we say one of these commands to the app, two things happen:

  • Alan sends the command provided in the intent to the app. To send the command, we need to specify a JSON object in the p.play function. Here the object contains the command name and routing data: forward or back.

  • Alan plays back the action confirmation to us.

Step 3: Handle commands on the app side

When we say Navigate forward or Go back, Alan sends a command to the app. We need to handle this command on the app side and make sure an appropriate action is performed. Let’s add a handler for Alan events to our app.

  1. In the ViewController.swift file, in ViewDidLoad(), call the setupAlanEventHandler() function:

    ViewController.swift
    class ViewController: UINavigationController {
    
        /// Alan button
        fileprivate var button: AlanButton!
    
        override func viewDidLoad() {
            super.viewDidLoad()
    
            /// Set up the Alan button
            self.setupAlan()
    
            /// Set up a handler for events from Alan
            self.setupAlanEventHandler()
        }
    }
    
  2. To the ViewController class, add the function itself. In this function, we add an observer for events coming from the Alan voice script. Once an event is received, the handleEvent() function is invoked.

    ViewController.swift
    class ViewController: UINavigationController {
        fileprivate func setupAlanEventHandler() {
            /// Add an observer to get events from Alan
            NotificationCenter.default.addObserver(self, selector: #selector(self.handleEvent(_:)), name:NSNotification.Name(rawValue: "kAlanSDKEventNotification"), object:nil)
        }
    
        @objc func handleEvent(_ notification: Notification) {
        /// Get the user info object with JSON from Alan
        guard let userInfo = notification.userInfo,
            let jsonString = userInfo["jsonString"] as? String,
            let jsonData = jsonString.data(using: .utf8),
            let jsonObject = try? JSONSerialization.jsonObject(with: jsonData, options: []) as? [String: Any],
            /// Get the object with the command data
            let commandObject = jsonObject["data"] as? [String: Any],
            /// Get the command name string
            let commandString = commandObject["command"] as? String
        else {
            return
        }
            /// Get the command name string
            if commandString == "navigation" {
                /// Get the route name string
                guard let routeString = commandObject["route"] as? String else {
                    return
                }
                /// Forward command
                if routeString == "forward" {
                    DispatchQueue.main.async {
                        self.goForward()
                    }
                }
                /// Back command
                else if routeString == "back" {
                    DispatchQueue.main.async {
                        self.goBack()
                    }
                }
            }
        }
    }
    
  3. And finally, to the ViewController class, add functions to navigate to the necessary view: goForward() and goBack(). Have a look at the goForward() function: here we use the ID of the segue we created in the first step.

    ViewController.swift
    class ViewController: UINavigationController {
        fileprivate func goForward() {
            /// Get the first view controller
            if let firstVC = self.viewControllers.first {
                /// Perform a segue to push the second view controller to the navigation stack. The segue is defined in the storyboard.
                firstVC.performSegue(withIdentifier: "goForward", sender: self)
            }
        }
    
        fileprivate func goBack() {
            /// Remove the second (last) view controller from the navigation stack
            self.popViewController(animated: true)
        }
    }
    

Let’s review the code above to see how it works. When the Navigation Controller is loaded, the setupAlanEventHandler() is invoked, and our app starts listening for events coming from Alan. Once an event, in our case, a command with a JSON object, is received from the voice script, the handleEvent() function is triggered. The function processes the object and checks the value passed in the route key.

If the value is forward, the goForward() function is invoked, taking us to the second view. If the value is back, the goBack() function is invoked, and the initial view is displayed.

You can test it: run the app on the simulator, tap the Alan button and say: Navigate forward. The app will open the second view. Then say Go back, and the initial view will be displayed.

What you finally get

After you pass through this tutorial, you will have an iOS app with two views and will be able to send voice commands to navigate between them. You can get an example of such an app from the Alan GitHub to make sure you have set up your app correctly.

  • SwiftTutorial.part2.zip: XCode project of the app

  • SwiftTutorial.part2.js: voice commands used for this tutorial

What’s next?

Have a look at the next tutorial: Passing the app state to the voice script.

Next
Passing the app state to the voice script (iOS)
Previous
Building a voice assistant for an iOS Swift app
Alan® is a trademark of Alan AI, Inc. Handcrafted in Sunnyvale, California
Download Alan Playground to see how Conversational Voice Experiences can add value to your application or test your Alan Studio Projects.
On this page
  • Navigating between views (iOS)
    • What you will learn
    • What you will need
    • Step 1: Add a new view to the app
    • Step 2: Add voice commands to navigate between views
    • Step 3: Handle commands on the app side
    • What you finally get
    • What’s next?