Chat buttons
To enhance and streamline the user experience, you can display buttons in the Alan AI Agentic Interface.
Buttons are clickable elements that present users with a list of options or actions they can take. When the user clicks a button, the Agentic Interface responds back or triggers some logic defined in the dialog script.
Buttons can be used for a variety of purposes, including:
Presenting a menu of options
Initiating specific tasks or actions
Providing quick access to commonly used features
Confirming or denying users’ actions
Submitting requests and more
Buttons setup
To display buttons in the Agentic Interface UI, use the showButtons() function in the script.
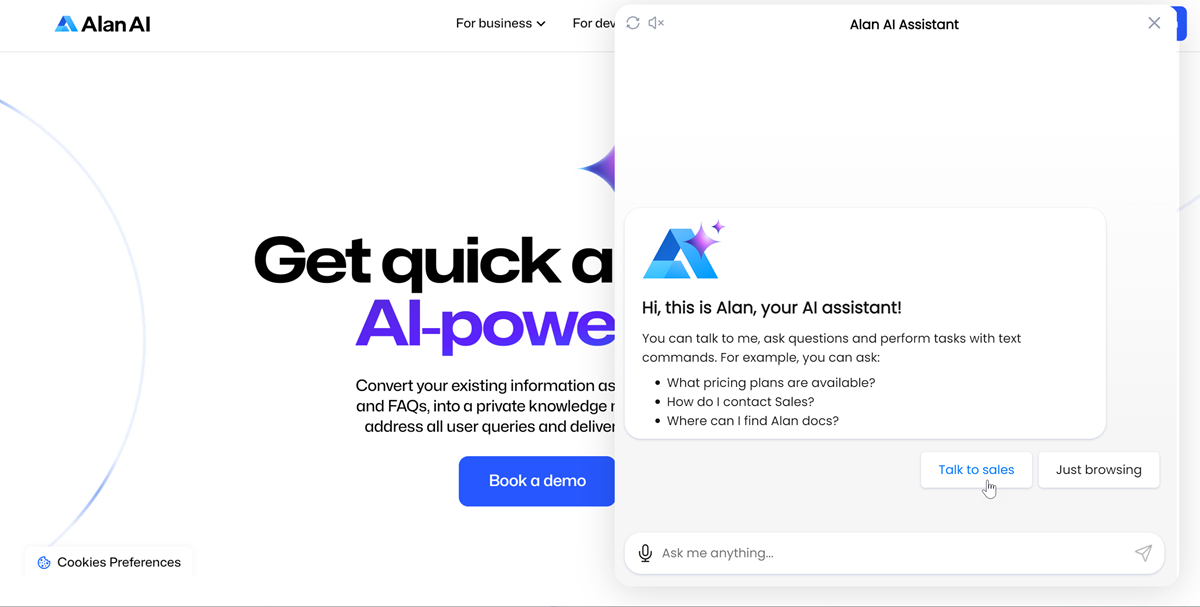
In the example below, when a new dialog session starts, the Agentic Interface displays a greeting with two buttons: Talk to sales and Just browsing:
onCreateUser(p => {
    // Chat greeting
    const greetingImage = "https://storage.googleapis.com/alan-public-images/alan-webflow-website/alan-chat-logo.svg";
    const greetingTitle = "Hi, this is Alan, your Agentic Interface!";
    const greetingText = "You can talk to me, ask questions and perform tasks with text commands. For example, you can ask: \n - What pricing plans are available? \n - How do I contact Sales? \n - Where can I find Alan docs?";
    const image = `<svg width="120" height="120" viewBox="0 0 120 120" fill="none" xmlns="http://www.w3.org/2000/svg"><g filter="url(#filter0_ii_1468_11592)"><path d="M77.1061 20.0034H42.9889L0.0263672 99.1702H33.1959L77.1061 20.0034Z" fill="url(#paint0_radial_1468_11592)"></path></g><g filter="url(#filter1_ii_1468_11592)"><path d="M76.0556 99.1678L60.2605 70.894H15.336L0 99.1678H76.0556Z" fill="url(#paint1_radial_1468_11592)"></path></g><g filter="url(#filter2_ii_1468_11592)"><path d="M33.1891 99.1678L48.8707 70.894H15.358L0.0219727 99.1678H33.1891Z" fill="url(#paint2_radial_1468_11592)"></path></g><g filter="url(#filter3_ii_1468_11592)"><path d="M42.9199 20H77.0374L120 99.1669H86.8304L42.9199 20Z" fill="url(#paint3_radial_1468_11592)"></path></g><defs><filter id="filter0_ii_1468_11592" x="-0.137827" y="19.675" width="77.2438" height="79.4951" filterUnits="userSpaceOnUse" color-interpolation-filters="sRGB"><feFlood flood-opacity="0" result="BackgroundImageFix"></feFlood><feBlend mode="normal" in="SourceGraphic" in2="BackgroundImageFix" result="shape"></feBlend><feColorMatrix in="SourceAlpha" type="matrix" values="0 0 0 0 0 0 0 0 0 0 0 0 0 0 0 0 0 0 127 0" result="hardAlpha"></feColorMatrix><feOffset dx="-0.164194" dy="-0.328387"></feOffset><feGaussianBlur stdDeviation="4.4811"></feGaussianBlur><feComposite in2="hardAlpha" operator="arithmetic" k2="-1" k3="1"></feComposite><feColorMatrix type="matrix" values="0 0 0 0 0.454167 0 0 0 0 0.869 0 0 0 0 1 0 0 0 0.5 0"></feColorMatrix><feBlend mode="normal" in2="shape" result="effect1_innerShadow_1468_11592"></feBlend><feColorMatrix in="SourceAlpha" type="matrix" values="0 0 0 0 0 0 0 0 0 0 0 0 0 0 0 0 0 0 127 0" result="hardAlpha"></feColorMatrix><feOffset></feOffset><feGaussianBlur stdDeviation="1.57336"></feGaussianBlur><feComposite in2="hardAlpha" operator="arithmetic" k2="-1" k3="1"></feComposite><feColorMatrix type="matrix" values="0 0 0 0 0.591667 0 0 0 0 0.755 0 0 0 0 1 0 0 0 1 0"></feColorMatrix><feBlend mode="overlay" in2="effect1_innerShadow_1468_11592" result="effect2_innerShadow_1468_11592"></feBlend></filter><filter id="filter1_ii_1468_11592" x="-0.164194" y="70.5657" width="76.2199" height="28.6022" filterUnits="userSpaceOnUse" color-interpolation-filters="sRGB"><feFlood flood-opacity="0" result="BackgroundImageFix"></feFlood><feBlend mode="normal" in="SourceGraphic" in2="BackgroundImageFix" result="shape"></feBlend><feColorMatrix in="SourceAlpha" type="matrix" values="0 0 0 0 0 0 0 0 0 0 0 0 0 0 0 0 0 0 127 0" result="hardAlpha"></feColorMatrix><feOffset dx="-0.164194" dy="-0.328387"></feOffset><feGaussianBlur stdDeviation="4.4811"></feGaussianBlur><feComposite in2="hardAlpha" operator="arithmetic" k2="-1" k3="1"></feComposite><feColorMatrix type="matrix" values="0 0 0 0 0.454167 0 0 0 0 0.869 0 0 0 0 1 0 0 0 0.5 0"></feColorMatrix><feBlend mode="normal" in2="shape" result="effect1_innerShadow_1468_11592"></feBlend><feColorMatrix in="SourceAlpha" type="matrix" values="0 0 0 0 0 0 0 0 0 0 0 0 0 0 0 0 0 0 127 0" result="hardAlpha"></feColorMatrix><feOffset></feOffset><feGaussianBlur stdDeviation="1.57336"></feGaussianBlur><feComposite in2="hardAlpha" operator="arithmetic" k2="-1" k3="1"></feComposite><feColorMatrix type="matrix" values="0 0 0 0 0.591667 0 0 0 0 0.755 0 0 0 0 1 0 0 0 1 0"></feColorMatrix><feBlend mode="overlay" in2="effect1_innerShadow_1468_11592" result="effect2_innerShadow_1468_11592"></feBlend></filter><filter id="filter2_ii_1468_11592" x="-0.142221" y="70.5657" width="49.0128" height="28.6022" filterUnits="userSpaceOnUse" color-interpolation-filters="sRGB"><feFlood flood-opacity="0" result="BackgroundImageFix"></feFlood><feBlend mode="normal" in="SourceGraphic" in2="BackgroundImageFix" result="shape"></feBlend><feColorMatrix in="SourceAlpha" type="matrix" values="0 0 0 0 0 0 0 0 0 0 0 0 0 0 0 0 0 0 127 0" result="hardAlpha"></feColorMatrix><feOffset dx="-0.164194" dy="-0.328387"></feOffset><feGaussianBlur stdDeviation="4.4811"></feGaussianBlur><feComposite in2="hardAlpha" operator="arithmetic" k2="-1" k3="1"></feComposite><feColorMatrix type="matrix" values="0 0 0 0 0.454167 0 0 0 0 0.869 0 0 0 0 1 0 0 0 0.5 0"></feColorMatrix><feBlend mode="normal" in2="shape" result="effect1_innerShadow_1468_11592"></feBlend><feColorMatrix in="SourceAlpha" type="matrix" values="0 0 0 0 0 0 0 0 0 0 0 0 0 0 0 0 0 0 127 0" result="hardAlpha"></feColorMatrix><feOffset></feOffset><feGaussianBlur stdDeviation="1.57336"></feGaussianBlur><feComposite in2="hardAlpha" operator="arithmetic" k2="-1" k3="1"></feComposite><feColorMatrix type="matrix" values="0 0 0 0 0.591667 0 0 0 0 0.755 0 0 0 0 1 0 0 0 1 0"></feColorMatrix><feBlend mode="overlay" in2="effect1_innerShadow_1468_11592" result="effect2_innerShadow_1468_11592"></feBlend></filter><filter id="filter3_ii_1468_11592" x="42.7557" y="19.6716" width="77.2443" height="79.4953" filterUnits="userSpaceOnUse" color-interpolation-filters="sRGB"><feFlood flood-opacity="0" result="BackgroundImageFix"></feFlood><feBlend mode="normal" in="SourceGraphic" in2="BackgroundImageFix" result="shape"></feBlend><feColorMatrix in="SourceAlpha" type="matrix" values="0 0 0 0 0 0 0 0 0 0 0 0 0 0 0 0 0 0 127 0" result="hardAlpha"></feColorMatrix><feOffset dx="-0.164194" dy="-0.328387"></feOffset><feGaussianBlur stdDeviation="4.4811"></feGaussianBlur><feComposite in2="hardAlpha" operator="arithmetic" k2="-1" k3="1"></feComposite><feColorMatrix type="matrix" values="0 0 0 0 0.454167 0 0 0 0 0.869 0 0 0 0 1 0 0 0 0.5 0"></feColorMatrix><feBlend mode="normal" in2="shape" result="effect1_innerShadow_1468_11592"></feBlend><feColorMatrix in="SourceAlpha" type="matrix" values="0 0 0 0 0 0 0 0 0 0 0 0 0 0 0 0 0 0 127 0" result="hardAlpha"></feColorMatrix><feOffset></feOffset><feGaussianBlur stdDeviation="1.57336"></feGaussianBlur><feComposite in2="hardAlpha" operator="arithmetic" k2="-1" k3="1"></feComposite><feColorMatrix type="matrix" values="0 0 0 0 0.591667 0 0 0 0 0.755 0 0 0 0 1 0 0 0 1 0"></feColorMatrix><feBlend mode="overlay" in2="effect1_innerShadow_1468_11592" result="effect2_innerShadow_1468_11592"></feBlend></filter><radialGradient id="paint0_radial_1468_11592" cx="0" cy="0" r="1" gradientUnits="userSpaceOnUse" gradientTransform="translate(8.66131 30.1481) rotate(51.2129) scale(88.5491 62.7836)"><stop stop-color="#FFE8FD"></stop><stop offset="0.40625" stop-color="#D365FA"></stop><stop offset="0.708333" stop-color="#6A46D0"></stop><stop offset="0.994792" stop-color="#1F008D"></stop></radialGradient><radialGradient id="paint1_radial_1468_11592" cx="0" cy="0" r="1" gradientUnits="userSpaceOnUse" gradientTransform="translate(35.1181 31.8277) rotate(67.3247) scale(72.9812 95.8932)"><stop stop-color="#FFE8FD"></stop><stop offset="0.40625" stop-color="#D365FA"></stop><stop offset="0.708333" stop-color="#6A46D0"></stop><stop offset="0.994792" stop-color="#1F008D"></stop></radialGradient><radialGradient id="paint2_radial_1468_11592" cx="0" cy="0" r="1" gradientUnits="userSpaceOnUse" gradientTransform="translate(-0.000120833 54.5049) rotate(47.6945) scale(60.3907 65.5566)"><stop stop-color="#FFE8FD"></stop><stop offset="0.40625" stop-color="#D365FA"></stop><stop offset="0.708333" stop-color="#6A46D0"></stop><stop offset="0.994792" stop-color="#1F008D"></stop></radialGradient><radialGradient id="paint3_radial_1468_11592" cx="0" cy="0" r="1" gradientUnits="userSpaceOnUse" gradientTransform="translate(66.5616 -4.76014) rotate(68.7269) scale(111.526 79.0751)"><stop stop-color="#FFE8FD"></stop><stop offset="0.40625" stop-color="#D365FA"></stop><stop offset="0.708333" stop-color="#6A46D0"></stop><stop offset="0.994792" stop-color="#1F008D"></stop></radialGradient></defs></svg>`;
    const title = `<div style="margin-bottom: 10px;font-weight: 700;font-size: 20px;">${greetingTitle}</div>`;
    p.play(`${image}${title}${greetingText}`, opts({ force: true, markdown: true, audio: false, greeting: true}));

    // Chat buttons
    p.showButtons({
        buttons:[
            {label:'Talk to sales'},
            {label:'Just browsing'},
        ],
        force: true
    });
});

intent("Talk to sales", p => {
    p.play("Awesome, I just need to confirm some information first...");
});

intent("Just browsing", p => {
    p.play("What would you like me to do?");
});
Button parameters
The showButtons() function takes the following parameters:
Name |
Type |
Description |
|---|---|---|
|
Array |
Contains a list of buttons to be displayed in the chat. For each button in the list, the following parameters must be defined:
|
|
Boolean |
If |
Button actions
When a button is clicked, the Agentic Interface can perform one of the following actions:
Intents
On button click, you can invoke an intent in the dialog script. To do this, you can do either of the following:
Define only the
labelparameter for the button. In this case, the label text must match the pattern of the intent you want to invoke.Define the
labelandsendTextparameters for the button. In this case, the label text can vary, and the text of thesendTextparameter must match the pattern of the intent you want to invoke.
In the example below, when the Talk to sales and Just browsing buttons are clicked, corresponding intents are invoked in the dialog script. Note that the label for the second button differs from the pattern of the intent to be invoked:
onCreateUser(p => {
    // Chat greeting
    const greetingImage = "https://storage.googleapis.com/alan-public-images/alan-webflow-website/alan-chat-logo.svg";
    const greetingTitle = "Hi, this is Alan, your Agentic Interface!";
    const greetingText = "You can talk to me, ask questions and perform tasks with text commands. For example, you can ask: \n - What pricing plans are available? \n - How do I contact Sales? \n - Where can I find Alan docs?";
    const image = `<svg width="120" height="120" viewBox="0 0 120 120" fill="none" xmlns="http://www.w3.org/2000/svg"><g filter="url(#filter0_ii_1468_11592)"><path d="M77.1061 20.0034H42.9889L0.0263672 99.1702H33.1959L77.1061 20.0034Z" fill="url(#paint0_radial_1468_11592)"></path></g><g filter="url(#filter1_ii_1468_11592)"><path d="M76.0556 99.1678L60.2605 70.894H15.336L0 99.1678H76.0556Z" fill="url(#paint1_radial_1468_11592)"></path></g><g filter="url(#filter2_ii_1468_11592)"><path d="M33.1891 99.1678L48.8707 70.894H15.358L0.0219727 99.1678H33.1891Z" fill="url(#paint2_radial_1468_11592)"></path></g><g filter="url(#filter3_ii_1468_11592)"><path d="M42.9199 20H77.0374L120 99.1669H86.8304L42.9199 20Z" fill="url(#paint3_radial_1468_11592)"></path></g><defs><filter id="filter0_ii_1468_11592" x="-0.137827" y="19.675" width="77.2438" height="79.4951" filterUnits="userSpaceOnUse" color-interpolation-filters="sRGB"><feFlood flood-opacity="0" result="BackgroundImageFix"></feFlood><feBlend mode="normal" in="SourceGraphic" in2="BackgroundImageFix" result="shape"></feBlend><feColorMatrix in="SourceAlpha" type="matrix" values="0 0 0 0 0 0 0 0 0 0 0 0 0 0 0 0 0 0 127 0" result="hardAlpha"></feColorMatrix><feOffset dx="-0.164194" dy="-0.328387"></feOffset><feGaussianBlur stdDeviation="4.4811"></feGaussianBlur><feComposite in2="hardAlpha" operator="arithmetic" k2="-1" k3="1"></feComposite><feColorMatrix type="matrix" values="0 0 0 0 0.454167 0 0 0 0 0.869 0 0 0 0 1 0 0 0 0.5 0"></feColorMatrix><feBlend mode="normal" in2="shape" result="effect1_innerShadow_1468_11592"></feBlend><feColorMatrix in="SourceAlpha" type="matrix" values="0 0 0 0 0 0 0 0 0 0 0 0 0 0 0 0 0 0 127 0" result="hardAlpha"></feColorMatrix><feOffset></feOffset><feGaussianBlur stdDeviation="1.57336"></feGaussianBlur><feComposite in2="hardAlpha" operator="arithmetic" k2="-1" k3="1"></feComposite><feColorMatrix type="matrix" values="0 0 0 0 0.591667 0 0 0 0 0.755 0 0 0 0 1 0 0 0 1 0"></feColorMatrix><feBlend mode="overlay" in2="effect1_innerShadow_1468_11592" result="effect2_innerShadow_1468_11592"></feBlend></filter><filter id="filter1_ii_1468_11592" x="-0.164194" y="70.5657" width="76.2199" height="28.6022" filterUnits="userSpaceOnUse" color-interpolation-filters="sRGB"><feFlood flood-opacity="0" result="BackgroundImageFix"></feFlood><feBlend mode="normal" in="SourceGraphic" in2="BackgroundImageFix" result="shape"></feBlend><feColorMatrix in="SourceAlpha" type="matrix" values="0 0 0 0 0 0 0 0 0 0 0 0 0 0 0 0 0 0 127 0" result="hardAlpha"></feColorMatrix><feOffset dx="-0.164194" dy="-0.328387"></feOffset><feGaussianBlur stdDeviation="4.4811"></feGaussianBlur><feComposite in2="hardAlpha" operator="arithmetic" k2="-1" k3="1"></feComposite><feColorMatrix type="matrix" values="0 0 0 0 0.454167 0 0 0 0 0.869 0 0 0 0 1 0 0 0 0.5 0"></feColorMatrix><feBlend mode="normal" in2="shape" result="effect1_innerShadow_1468_11592"></feBlend><feColorMatrix in="SourceAlpha" type="matrix" values="0 0 0 0 0 0 0 0 0 0 0 0 0 0 0 0 0 0 127 0" result="hardAlpha"></feColorMatrix><feOffset></feOffset><feGaussianBlur stdDeviation="1.57336"></feGaussianBlur><feComposite in2="hardAlpha" operator="arithmetic" k2="-1" k3="1"></feComposite><feColorMatrix type="matrix" values="0 0 0 0 0.591667 0 0 0 0 0.755 0 0 0 0 1 0 0 0 1 0"></feColorMatrix><feBlend mode="overlay" in2="effect1_innerShadow_1468_11592" result="effect2_innerShadow_1468_11592"></feBlend></filter><filter id="filter2_ii_1468_11592" x="-0.142221" y="70.5657" width="49.0128" height="28.6022" filterUnits="userSpaceOnUse" color-interpolation-filters="sRGB"><feFlood flood-opacity="0" result="BackgroundImageFix"></feFlood><feBlend mode="normal" in="SourceGraphic" in2="BackgroundImageFix" result="shape"></feBlend><feColorMatrix in="SourceAlpha" type="matrix" values="0 0 0 0 0 0 0 0 0 0 0 0 0 0 0 0 0 0 127 0" result="hardAlpha"></feColorMatrix><feOffset dx="-0.164194" dy="-0.328387"></feOffset><feGaussianBlur stdDeviation="4.4811"></feGaussianBlur><feComposite in2="hardAlpha" operator="arithmetic" k2="-1" k3="1"></feComposite><feColorMatrix type="matrix" values="0 0 0 0 0.454167 0 0 0 0 0.869 0 0 0 0 1 0 0 0 0.5 0"></feColorMatrix><feBlend mode="normal" in2="shape" result="effect1_innerShadow_1468_11592"></feBlend><feColorMatrix in="SourceAlpha" type="matrix" values="0 0 0 0 0 0 0 0 0 0 0 0 0 0 0 0 0 0 127 0" result="hardAlpha"></feColorMatrix><feOffset></feOffset><feGaussianBlur stdDeviation="1.57336"></feGaussianBlur><feComposite in2="hardAlpha" operator="arithmetic" k2="-1" k3="1"></feComposite><feColorMatrix type="matrix" values="0 0 0 0 0.591667 0 0 0 0 0.755 0 0 0 0 1 0 0 0 1 0"></feColorMatrix><feBlend mode="overlay" in2="effect1_innerShadow_1468_11592" result="effect2_innerShadow_1468_11592"></feBlend></filter><filter id="filter3_ii_1468_11592" x="42.7557" y="19.6716" width="77.2443" height="79.4953" filterUnits="userSpaceOnUse" color-interpolation-filters="sRGB"><feFlood flood-opacity="0" result="BackgroundImageFix"></feFlood><feBlend mode="normal" in="SourceGraphic" in2="BackgroundImageFix" result="shape"></feBlend><feColorMatrix in="SourceAlpha" type="matrix" values="0 0 0 0 0 0 0 0 0 0 0 0 0 0 0 0 0 0 127 0" result="hardAlpha"></feColorMatrix><feOffset dx="-0.164194" dy="-0.328387"></feOffset><feGaussianBlur stdDeviation="4.4811"></feGaussianBlur><feComposite in2="hardAlpha" operator="arithmetic" k2="-1" k3="1"></feComposite><feColorMatrix type="matrix" values="0 0 0 0 0.454167 0 0 0 0 0.869 0 0 0 0 1 0 0 0 0.5 0"></feColorMatrix><feBlend mode="normal" in2="shape" result="effect1_innerShadow_1468_11592"></feBlend><feColorMatrix in="SourceAlpha" type="matrix" values="0 0 0 0 0 0 0 0 0 0 0 0 0 0 0 0 0 0 127 0" result="hardAlpha"></feColorMatrix><feOffset></feOffset><feGaussianBlur stdDeviation="1.57336"></feGaussianBlur><feComposite in2="hardAlpha" operator="arithmetic" k2="-1" k3="1"></feComposite><feColorMatrix type="matrix" values="0 0 0 0 0.591667 0 0 0 0 0.755 0 0 0 0 1 0 0 0 1 0"></feColorMatrix><feBlend mode="overlay" in2="effect1_innerShadow_1468_11592" result="effect2_innerShadow_1468_11592"></feBlend></filter><radialGradient id="paint0_radial_1468_11592" cx="0" cy="0" r="1" gradientUnits="userSpaceOnUse" gradientTransform="translate(8.66131 30.1481) rotate(51.2129) scale(88.5491 62.7836)"><stop stop-color="#FFE8FD"></stop><stop offset="0.40625" stop-color="#D365FA"></stop><stop offset="0.708333" stop-color="#6A46D0"></stop><stop offset="0.994792" stop-color="#1F008D"></stop></radialGradient><radialGradient id="paint1_radial_1468_11592" cx="0" cy="0" r="1" gradientUnits="userSpaceOnUse" gradientTransform="translate(35.1181 31.8277) rotate(67.3247) scale(72.9812 95.8932)"><stop stop-color="#FFE8FD"></stop><stop offset="0.40625" stop-color="#D365FA"></stop><stop offset="0.708333" stop-color="#6A46D0"></stop><stop offset="0.994792" stop-color="#1F008D"></stop></radialGradient><radialGradient id="paint2_radial_1468_11592" cx="0" cy="0" r="1" gradientUnits="userSpaceOnUse" gradientTransform="translate(-0.000120833 54.5049) rotate(47.6945) scale(60.3907 65.5566)"><stop stop-color="#FFE8FD"></stop><stop offset="0.40625" stop-color="#D365FA"></stop><stop offset="0.708333" stop-color="#6A46D0"></stop><stop offset="0.994792" stop-color="#1F008D"></stop></radialGradient><radialGradient id="paint3_radial_1468_11592" cx="0" cy="0" r="1" gradientUnits="userSpaceOnUse" gradientTransform="translate(66.5616 -4.76014) rotate(68.7269) scale(111.526 79.0751)"><stop stop-color="#FFE8FD"></stop><stop offset="0.40625" stop-color="#D365FA"></stop><stop offset="0.708333" stop-color="#6A46D0"></stop><stop offset="0.994792" stop-color="#1F008D"></stop></radialGradient></defs></svg>`;
    const title = `<div style="margin-bottom: 10px;font-weight: 700;font-size: 20px;">${greetingTitle}</div>`;
    p.play(`${image}${title}${greetingText}`, opts({ force: true, markdown: true, audio: false, greeting: true}));

    // Chat buttons
    p.showButtons({
        buttons:[
            {label:'Talk to sales'},
            {label:'Just browsing', sendText: "I am just browsing"},
        ],
        force: true
    });
});

intent("Talk to sales", p => {
    p.play("Awesome, I just need to confirm some information first...");
});

intent("I am just browsing", p => {
    p.play("What would you like me to do?");
});
Visual state
On button click, you can set the visual state in the dialog. To do this, you must add the setVusialState parameter to the button and define the visual state data.
In the example below, when the Go to docs button is clicked, the visual state is set to docs and the Agentic Interface plays a message: Welcome to Alan AI docs!:
onCreateUser(p => {
    // Chat greeting
    const greetingImage = "https://storage.googleapis.com/alan-public-images/alan-webflow-website/alan-chat-logo.svg";
    const greetingTitle = "Hi, this is Alan, your Agentic Interface!";
    const greetingText = "You can talk to me, ask questions and perform tasks with text commands. For example, you can ask: \n - What pricing plans are available? \n - How do I contact Sales? \n - Where can I find Alan docs?";
    const image = `<svg width="120" height="120" viewBox="0 0 120 120" fill="none" xmlns="http://www.w3.org/2000/svg"><g filter="url(#filter0_ii_1468_11592)"><path d="M77.1061 20.0034H42.9889L0.0263672 99.1702H33.1959L77.1061 20.0034Z" fill="url(#paint0_radial_1468_11592)"></path></g><g filter="url(#filter1_ii_1468_11592)"><path d="M76.0556 99.1678L60.2605 70.894H15.336L0 99.1678H76.0556Z" fill="url(#paint1_radial_1468_11592)"></path></g><g filter="url(#filter2_ii_1468_11592)"><path d="M33.1891 99.1678L48.8707 70.894H15.358L0.0219727 99.1678H33.1891Z" fill="url(#paint2_radial_1468_11592)"></path></g><g filter="url(#filter3_ii_1468_11592)"><path d="M42.9199 20H77.0374L120 99.1669H86.8304L42.9199 20Z" fill="url(#paint3_radial_1468_11592)"></path></g><defs><filter id="filter0_ii_1468_11592" x="-0.137827" y="19.675" width="77.2438" height="79.4951" filterUnits="userSpaceOnUse" color-interpolation-filters="sRGB"><feFlood flood-opacity="0" result="BackgroundImageFix"></feFlood><feBlend mode="normal" in="SourceGraphic" in2="BackgroundImageFix" result="shape"></feBlend><feColorMatrix in="SourceAlpha" type="matrix" values="0 0 0 0 0 0 0 0 0 0 0 0 0 0 0 0 0 0 127 0" result="hardAlpha"></feColorMatrix><feOffset dx="-0.164194" dy="-0.328387"></feOffset><feGaussianBlur stdDeviation="4.4811"></feGaussianBlur><feComposite in2="hardAlpha" operator="arithmetic" k2="-1" k3="1"></feComposite><feColorMatrix type="matrix" values="0 0 0 0 0.454167 0 0 0 0 0.869 0 0 0 0 1 0 0 0 0.5 0"></feColorMatrix><feBlend mode="normal" in2="shape" result="effect1_innerShadow_1468_11592"></feBlend><feColorMatrix in="SourceAlpha" type="matrix" values="0 0 0 0 0 0 0 0 0 0 0 0 0 0 0 0 0 0 127 0" result="hardAlpha"></feColorMatrix><feOffset></feOffset><feGaussianBlur stdDeviation="1.57336"></feGaussianBlur><feComposite in2="hardAlpha" operator="arithmetic" k2="-1" k3="1"></feComposite><feColorMatrix type="matrix" values="0 0 0 0 0.591667 0 0 0 0 0.755 0 0 0 0 1 0 0 0 1 0"></feColorMatrix><feBlend mode="overlay" in2="effect1_innerShadow_1468_11592" result="effect2_innerShadow_1468_11592"></feBlend></filter><filter id="filter1_ii_1468_11592" x="-0.164194" y="70.5657" width="76.2199" height="28.6022" filterUnits="userSpaceOnUse" color-interpolation-filters="sRGB"><feFlood flood-opacity="0" result="BackgroundImageFix"></feFlood><feBlend mode="normal" in="SourceGraphic" in2="BackgroundImageFix" result="shape"></feBlend><feColorMatrix in="SourceAlpha" type="matrix" values="0 0 0 0 0 0 0 0 0 0 0 0 0 0 0 0 0 0 127 0" result="hardAlpha"></feColorMatrix><feOffset dx="-0.164194" dy="-0.328387"></feOffset><feGaussianBlur stdDeviation="4.4811"></feGaussianBlur><feComposite in2="hardAlpha" operator="arithmetic" k2="-1" k3="1"></feComposite><feColorMatrix type="matrix" values="0 0 0 0 0.454167 0 0 0 0 0.869 0 0 0 0 1 0 0 0 0.5 0"></feColorMatrix><feBlend mode="normal" in2="shape" result="effect1_innerShadow_1468_11592"></feBlend><feColorMatrix in="SourceAlpha" type="matrix" values="0 0 0 0 0 0 0 0 0 0 0 0 0 0 0 0 0 0 127 0" result="hardAlpha"></feColorMatrix><feOffset></feOffset><feGaussianBlur stdDeviation="1.57336"></feGaussianBlur><feComposite in2="hardAlpha" operator="arithmetic" k2="-1" k3="1"></feComposite><feColorMatrix type="matrix" values="0 0 0 0 0.591667 0 0 0 0 0.755 0 0 0 0 1 0 0 0 1 0"></feColorMatrix><feBlend mode="overlay" in2="effect1_innerShadow_1468_11592" result="effect2_innerShadow_1468_11592"></feBlend></filter><filter id="filter2_ii_1468_11592" x="-0.142221" y="70.5657" width="49.0128" height="28.6022" filterUnits="userSpaceOnUse" color-interpolation-filters="sRGB"><feFlood flood-opacity="0" result="BackgroundImageFix"></feFlood><feBlend mode="normal" in="SourceGraphic" in2="BackgroundImageFix" result="shape"></feBlend><feColorMatrix in="SourceAlpha" type="matrix" values="0 0 0 0 0 0 0 0 0 0 0 0 0 0 0 0 0 0 127 0" result="hardAlpha"></feColorMatrix><feOffset dx="-0.164194" dy="-0.328387"></feOffset><feGaussianBlur stdDeviation="4.4811"></feGaussianBlur><feComposite in2="hardAlpha" operator="arithmetic" k2="-1" k3="1"></feComposite><feColorMatrix type="matrix" values="0 0 0 0 0.454167 0 0 0 0 0.869 0 0 0 0 1 0 0 0 0.5 0"></feColorMatrix><feBlend mode="normal" in2="shape" result="effect1_innerShadow_1468_11592"></feBlend><feColorMatrix in="SourceAlpha" type="matrix" values="0 0 0 0 0 0 0 0 0 0 0 0 0 0 0 0 0 0 127 0" result="hardAlpha"></feColorMatrix><feOffset></feOffset><feGaussianBlur stdDeviation="1.57336"></feGaussianBlur><feComposite in2="hardAlpha" operator="arithmetic" k2="-1" k3="1"></feComposite><feColorMatrix type="matrix" values="0 0 0 0 0.591667 0 0 0 0 0.755 0 0 0 0 1 0 0 0 1 0"></feColorMatrix><feBlend mode="overlay" in2="effect1_innerShadow_1468_11592" result="effect2_innerShadow_1468_11592"></feBlend></filter><filter id="filter3_ii_1468_11592" x="42.7557" y="19.6716" width="77.2443" height="79.4953" filterUnits="userSpaceOnUse" color-interpolation-filters="sRGB"><feFlood flood-opacity="0" result="BackgroundImageFix"></feFlood><feBlend mode="normal" in="SourceGraphic" in2="BackgroundImageFix" result="shape"></feBlend><feColorMatrix in="SourceAlpha" type="matrix" values="0 0 0 0 0 0 0 0 0 0 0 0 0 0 0 0 0 0 127 0" result="hardAlpha"></feColorMatrix><feOffset dx="-0.164194" dy="-0.328387"></feOffset><feGaussianBlur stdDeviation="4.4811"></feGaussianBlur><feComposite in2="hardAlpha" operator="arithmetic" k2="-1" k3="1"></feComposite><feColorMatrix type="matrix" values="0 0 0 0 0.454167 0 0 0 0 0.869 0 0 0 0 1 0 0 0 0.5 0"></feColorMatrix><feBlend mode="normal" in2="shape" result="effect1_innerShadow_1468_11592"></feBlend><feColorMatrix in="SourceAlpha" type="matrix" values="0 0 0 0 0 0 0 0 0 0 0 0 0 0 0 0 0 0 127 0" result="hardAlpha"></feColorMatrix><feOffset></feOffset><feGaussianBlur stdDeviation="1.57336"></feGaussianBlur><feComposite in2="hardAlpha" operator="arithmetic" k2="-1" k3="1"></feComposite><feColorMatrix type="matrix" values="0 0 0 0 0.591667 0 0 0 0 0.755 0 0 0 0 1 0 0 0 1 0"></feColorMatrix><feBlend mode="overlay" in2="effect1_innerShadow_1468_11592" result="effect2_innerShadow_1468_11592"></feBlend></filter><radialGradient id="paint0_radial_1468_11592" cx="0" cy="0" r="1" gradientUnits="userSpaceOnUse" gradientTransform="translate(8.66131 30.1481) rotate(51.2129) scale(88.5491 62.7836)"><stop stop-color="#FFE8FD"></stop><stop offset="0.40625" stop-color="#D365FA"></stop><stop offset="0.708333" stop-color="#6A46D0"></stop><stop offset="0.994792" stop-color="#1F008D"></stop></radialGradient><radialGradient id="paint1_radial_1468_11592" cx="0" cy="0" r="1" gradientUnits="userSpaceOnUse" gradientTransform="translate(35.1181 31.8277) rotate(67.3247) scale(72.9812 95.8932)"><stop stop-color="#FFE8FD"></stop><stop offset="0.40625" stop-color="#D365FA"></stop><stop offset="0.708333" stop-color="#6A46D0"></stop><stop offset="0.994792" stop-color="#1F008D"></stop></radialGradient><radialGradient id="paint2_radial_1468_11592" cx="0" cy="0" r="1" gradientUnits="userSpaceOnUse" gradientTransform="translate(-0.000120833 54.5049) rotate(47.6945) scale(60.3907 65.5566)"><stop stop-color="#FFE8FD"></stop><stop offset="0.40625" stop-color="#D365FA"></stop><stop offset="0.708333" stop-color="#6A46D0"></stop><stop offset="0.994792" stop-color="#1F008D"></stop></radialGradient><radialGradient id="paint3_radial_1468_11592" cx="0" cy="0" r="1" gradientUnits="userSpaceOnUse" gradientTransform="translate(66.5616 -4.76014) rotate(68.7269) scale(111.526 79.0751)"><stop stop-color="#FFE8FD"></stop><stop offset="0.40625" stop-color="#D365FA"></stop><stop offset="0.708333" stop-color="#6A46D0"></stop><stop offset="0.994792" stop-color="#1F008D"></stop></radialGradient></defs></svg>`;
    const title = `<div style="margin-bottom: 10px;font-weight: 700;font-size: 20px;">${greetingTitle}</div>`;
    p.play(`${image}${title}${greetingText}`, opts({ force: true, markdown: true, audio: false, greeting: true}));

    // Chat buttons
    p.showButtons({
        buttons:[
            {label:'Talk to sales'},
            {label:'Go to docs', setVisualState: {page: "docs"}}
        ],
        force: true
    });
});

intent("Talk to sales", p => {
    p.play("Awesome, I just need to confirm some information first...");
});

onVisualState((p, s) => {
    console.log(JSON.stringify(s));
    if (s.page === "docs") {
        p.play("Welcome to Alan AI docs!")
    }
});
Project API
On button click, you can call a project API method in the dialog script. To do this, you must add the callProjectApi parameter to the button, define the method name and data you want to pass to the project API method.
In the example below, when the Contact support button is clicked, the contactSupport() project API method is called and the user’s name is passed to the method:
onCreateUser(p => {
    // Chat greeting
    const greetingImage = "https://storage.googleapis.com/alan-public-images/alan-webflow-website/alan-chat-logo.svg";
    const greetingTitle = "Hi, this is Alan, your Agentic Interface!";
    const greetingText = "You can talk to me, ask questions and perform tasks with text commands. For example, you can ask: \n - What pricing plans are available? \n - How do I contact Sales? \n - Where can I find Alan docs?";
    const image = `<img style="display: block;margin-bottom: 20px; height:75px" src="${greetingImage}"/>`;
    const title = `<div style="margin-bottom: 10px;font-weight: 700;font-size: 20px;">${greetingTitle}</div>`;
    p.play(`${image}${title}${greetingText}`, opts({ force: true, markdown: true, audio: false, greeting: true}));

    // Chat buttons
    p.showButtons({
        buttons:[
            {label:'Talk to sales'},
            {label:'Contact support', callProjectApi: {method:'contactSupport', data:{name:'John Smith'}}}
        ],
        force: true
    });
});

intent("Talk to sales", p => {
    p.play("Awesome, I just need to confirm some information first...");
});

projectAPI.contactSupport = function(p, param, callback) {
    p.userData.name = param.name
    p.play(`Thank you, ${p.userData.name}. Please provide a detailed description of the problem you have encountered...`);
    callback();
};
Button design
The design of buttons displayed in the Agentic Interface is defined at the project level. To change the buttons look:
At the top of the code editor, click Integrations.
Next to the Text chat option, click Change.
In the Web/Text chat view, scroll down to the Buttons section and adjust the buttons look as required. You can change the following settings:
Font size: specify the font size for Agentic Interface buttons. The value must be between 10px and 22px.
Top left order radius, Top right border radius, Bottom right border radius, Bottom left border radius: set the border radius for the corners of Agentic Interface buttons.
Font color: choose the font color for Agentic Interface buttons.
Background color: choose the background color for Agentic Interface buttons.
Border color: choose the border color for Agentic Interface buttons.
With shadow: disable this option not to show shadow for Agentic Interface buttons.
Buttons alignment and Button alignment in full screen mode: choose how Agentic Interface buttons must be aligned in the compact and full screen modes: on the left, in the center or on the right.
Button customization
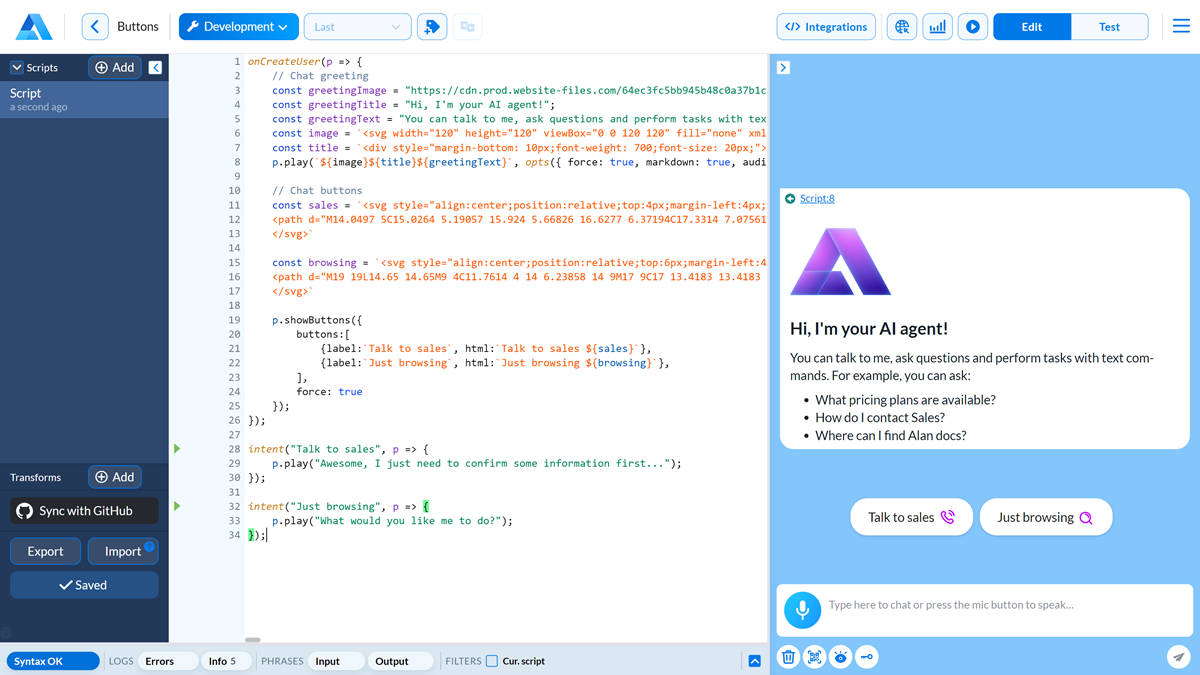
To customize the buttons look and feel, you can add the html parameter to the button code. In the example below, the html parameter is used to display an image next to the button labels:
onCreateUser(p => {
    // Chat greeting
    const greetingImage = "https://cdn.prod.website-files.com/64ec3fc5bb945b48c0a37b1c/64ec859abeec7a9efe7eef25_logo.svg";
    const greetingTitle = "Hi, I'm your Agentic Interface!";
    const greetingText = "You can talk to me, ask questions and perform tasks with text commands. For example, you can ask: \n - What pricing plans are available? \n - How do I contact Sales? \n - Where can I find Alan docs?";
    const image = `<svg width="120" height="120" viewBox="0 0 120 120" fill="none" xmlns="http://www.w3.org/2000/svg"><g filter="url(#filter0_ii_1468_11592)"><path d="M77.1061 20.0034H42.9889L0.0263672 99.1702H33.1959L77.1061 20.0034Z" fill="url(#paint0_radial_1468_11592)"></path></g><g filter="url(#filter1_ii_1468_11592)"><path d="M76.0556 99.1678L60.2605 70.894H15.336L0 99.1678H76.0556Z" fill="url(#paint1_radial_1468_11592)"></path></g><g filter="url(#filter2_ii_1468_11592)"><path d="M33.1891 99.1678L48.8707 70.894H15.358L0.0219727 99.1678H33.1891Z" fill="url(#paint2_radial_1468_11592)"></path></g><g filter="url(#filter3_ii_1468_11592)"><path d="M42.9199 20H77.0374L120 99.1669H86.8304L42.9199 20Z" fill="url(#paint3_radial_1468_11592)"></path></g><defs><filter id="filter0_ii_1468_11592" x="-0.137827" y="19.675" width="77.2438" height="79.4951" filterUnits="userSpaceOnUse" color-interpolation-filters="sRGB"><feFlood flood-opacity="0" result="BackgroundImageFix"></feFlood><feBlend mode="normal" in="SourceGraphic" in2="BackgroundImageFix" result="shape"></feBlend><feColorMatrix in="SourceAlpha" type="matrix" values="0 0 0 0 0 0 0 0 0 0 0 0 0 0 0 0 0 0 127 0" result="hardAlpha"></feColorMatrix><feOffset dx="-0.164194" dy="-0.328387"></feOffset><feGaussianBlur stdDeviation="4.4811"></feGaussianBlur><feComposite in2="hardAlpha" operator="arithmetic" k2="-1" k3="1"></feComposite><feColorMatrix type="matrix" values="0 0 0 0 0.454167 0 0 0 0 0.869 0 0 0 0 1 0 0 0 0.5 0"></feColorMatrix><feBlend mode="normal" in2="shape" result="effect1_innerShadow_1468_11592"></feBlend><feColorMatrix in="SourceAlpha" type="matrix" values="0 0 0 0 0 0 0 0 0 0 0 0 0 0 0 0 0 0 127 0" result="hardAlpha"></feColorMatrix><feOffset></feOffset><feGaussianBlur stdDeviation="1.57336"></feGaussianBlur><feComposite in2="hardAlpha" operator="arithmetic" k2="-1" k3="1"></feComposite><feColorMatrix type="matrix" values="0 0 0 0 0.591667 0 0 0 0 0.755 0 0 0 0 1 0 0 0 1 0"></feColorMatrix><feBlend mode="overlay" in2="effect1_innerShadow_1468_11592" result="effect2_innerShadow_1468_11592"></feBlend></filter><filter id="filter1_ii_1468_11592" x="-0.164194" y="70.5657" width="76.2199" height="28.6022" filterUnits="userSpaceOnUse" color-interpolation-filters="sRGB"><feFlood flood-opacity="0" result="BackgroundImageFix"></feFlood><feBlend mode="normal" in="SourceGraphic" in2="BackgroundImageFix" result="shape"></feBlend><feColorMatrix in="SourceAlpha" type="matrix" values="0 0 0 0 0 0 0 0 0 0 0 0 0 0 0 0 0 0 127 0" result="hardAlpha"></feColorMatrix><feOffset dx="-0.164194" dy="-0.328387"></feOffset><feGaussianBlur stdDeviation="4.4811"></feGaussianBlur><feComposite in2="hardAlpha" operator="arithmetic" k2="-1" k3="1"></feComposite><feColorMatrix type="matrix" values="0 0 0 0 0.454167 0 0 0 0 0.869 0 0 0 0 1 0 0 0 0.5 0"></feColorMatrix><feBlend mode="normal" in2="shape" result="effect1_innerShadow_1468_11592"></feBlend><feColorMatrix in="SourceAlpha" type="matrix" values="0 0 0 0 0 0 0 0 0 0 0 0 0 0 0 0 0 0 127 0" result="hardAlpha"></feColorMatrix><feOffset></feOffset><feGaussianBlur stdDeviation="1.57336"></feGaussianBlur><feComposite in2="hardAlpha" operator="arithmetic" k2="-1" k3="1"></feComposite><feColorMatrix type="matrix" values="0 0 0 0 0.591667 0 0 0 0 0.755 0 0 0 0 1 0 0 0 1 0"></feColorMatrix><feBlend mode="overlay" in2="effect1_innerShadow_1468_11592" result="effect2_innerShadow_1468_11592"></feBlend></filter><filter id="filter2_ii_1468_11592" x="-0.142221" y="70.5657" width="49.0128" height="28.6022" filterUnits="userSpaceOnUse" color-interpolation-filters="sRGB"><feFlood flood-opacity="0" result="BackgroundImageFix"></feFlood><feBlend mode="normal" in="SourceGraphic" in2="BackgroundImageFix" result="shape"></feBlend><feColorMatrix in="SourceAlpha" type="matrix" values="0 0 0 0 0 0 0 0 0 0 0 0 0 0 0 0 0 0 127 0" result="hardAlpha"></feColorMatrix><feOffset dx="-0.164194" dy="-0.328387"></feOffset><feGaussianBlur stdDeviation="4.4811"></feGaussianBlur><feComposite in2="hardAlpha" operator="arithmetic" k2="-1" k3="1"></feComposite><feColorMatrix type="matrix" values="0 0 0 0 0.454167 0 0 0 0 0.869 0 0 0 0 1 0 0 0 0.5 0"></feColorMatrix><feBlend mode="normal" in2="shape" result="effect1_innerShadow_1468_11592"></feBlend><feColorMatrix in="SourceAlpha" type="matrix" values="0 0 0 0 0 0 0 0 0 0 0 0 0 0 0 0 0 0 127 0" result="hardAlpha"></feColorMatrix><feOffset></feOffset><feGaussianBlur stdDeviation="1.57336"></feGaussianBlur><feComposite in2="hardAlpha" operator="arithmetic" k2="-1" k3="1"></feComposite><feColorMatrix type="matrix" values="0 0 0 0 0.591667 0 0 0 0 0.755 0 0 0 0 1 0 0 0 1 0"></feColorMatrix><feBlend mode="overlay" in2="effect1_innerShadow_1468_11592" result="effect2_innerShadow_1468_11592"></feBlend></filter><filter id="filter3_ii_1468_11592" x="42.7557" y="19.6716" width="77.2443" height="79.4953" filterUnits="userSpaceOnUse" color-interpolation-filters="sRGB"><feFlood flood-opacity="0" result="BackgroundImageFix"></feFlood><feBlend mode="normal" in="SourceGraphic" in2="BackgroundImageFix" result="shape"></feBlend><feColorMatrix in="SourceAlpha" type="matrix" values="0 0 0 0 0 0 0 0 0 0 0 0 0 0 0 0 0 0 127 0" result="hardAlpha"></feColorMatrix><feOffset dx="-0.164194" dy="-0.328387"></feOffset><feGaussianBlur stdDeviation="4.4811"></feGaussianBlur><feComposite in2="hardAlpha" operator="arithmetic" k2="-1" k3="1"></feComposite><feColorMatrix type="matrix" values="0 0 0 0 0.454167 0 0 0 0 0.869 0 0 0 0 1 0 0 0 0.5 0"></feColorMatrix><feBlend mode="normal" in2="shape" result="effect1_innerShadow_1468_11592"></feBlend><feColorMatrix in="SourceAlpha" type="matrix" values="0 0 0 0 0 0 0 0 0 0 0 0 0 0 0 0 0 0 127 0" result="hardAlpha"></feColorMatrix><feOffset></feOffset><feGaussianBlur stdDeviation="1.57336"></feGaussianBlur><feComposite in2="hardAlpha" operator="arithmetic" k2="-1" k3="1"></feComposite><feColorMatrix type="matrix" values="0 0 0 0 0.591667 0 0 0 0 0.755 0 0 0 0 1 0 0 0 1 0"></feColorMatrix><feBlend mode="overlay" in2="effect1_innerShadow_1468_11592" result="effect2_innerShadow_1468_11592"></feBlend></filter><radialGradient id="paint0_radial_1468_11592" cx="0" cy="0" r="1" gradientUnits="userSpaceOnUse" gradientTransform="translate(8.66131 30.1481) rotate(51.2129) scale(88.5491 62.7836)"><stop stop-color="#FFE8FD"></stop><stop offset="0.40625" stop-color="#D365FA"></stop><stop offset="0.708333" stop-color="#6A46D0"></stop><stop offset="0.994792" stop-color="#1F008D"></stop></radialGradient><radialGradient id="paint1_radial_1468_11592" cx="0" cy="0" r="1" gradientUnits="userSpaceOnUse" gradientTransform="translate(35.1181 31.8277) rotate(67.3247) scale(72.9812 95.8932)"><stop stop-color="#FFE8FD"></stop><stop offset="0.40625" stop-color="#D365FA"></stop><stop offset="0.708333" stop-color="#6A46D0"></stop><stop offset="0.994792" stop-color="#1F008D"></stop></radialGradient><radialGradient id="paint2_radial_1468_11592" cx="0" cy="0" r="1" gradientUnits="userSpaceOnUse" gradientTransform="translate(-0.000120833 54.5049) rotate(47.6945) scale(60.3907 65.5566)"><stop stop-color="#FFE8FD"></stop><stop offset="0.40625" stop-color="#D365FA"></stop><stop offset="0.708333" stop-color="#6A46D0"></stop><stop offset="0.994792" stop-color="#1F008D"></stop></radialGradient><radialGradient id="paint3_radial_1468_11592" cx="0" cy="0" r="1" gradientUnits="userSpaceOnUse" gradientTransform="translate(66.5616 -4.76014) rotate(68.7269) scale(111.526 79.0751)"><stop stop-color="#FFE8FD"></stop><stop offset="0.40625" stop-color="#D365FA"></stop><stop offset="0.708333" stop-color="#6A46D0"></stop><stop offset="0.994792" stop-color="#1F008D"></stop></radialGradient></defs></svg>`;
    const title = `<div style="margin-bottom: 10px;font-weight: 700;font-size: 20px;">${greetingTitle}</div>`;
    p.play(`${image}${title}${greetingText}`, opts({ force: true, markdown: true, audio: false, greeting: true}));

    // Chat buttons
    const sales = `<svg style="align:center;position:relative;top:4px;margin-left:4px;" width="18px" height="18px" viewBox="0 0 24 24" fill="none" xmlns="http://www.w3.org/2000/svg">
    <path d="M14.0497 5C15.0264 5.19057 15.924 5.66826 16.6277 6.37194C17.3314 7.07561 17.8091 7.97326 17.9997 8.95M14.0497 1C16.0789 1.22544 17.9713 2.13417 19.4159 3.57701C20.8606 5.01984 21.7717 6.91101 21.9997 8.94M10.2266 12.8631C9.02506 11.6615 8.07627 10.3028 7.38028 8.85323C7.32041 8.72854 7.29048 8.66619 7.26748 8.5873C7.18576 8.30695 7.24446 7.96269 7.41447 7.72526C7.46231 7.65845 7.51947 7.60129 7.63378 7.48698C7.98338 7.13737 8.15819 6.96257 8.27247 6.78679C8.70347 6.1239 8.70347 5.26932 8.27247 4.60643C8.15819 4.43065 7.98338 4.25585 7.63378 3.90624L7.43891 3.71137C6.90747 3.17993 6.64174 2.91421 6.35636 2.76987C5.7888 2.4828 5.11854 2.4828 4.55098 2.76987C4.2656 2.91421 3.99987 3.17993 3.46843 3.71137L3.3108 3.86901C2.78117 4.39863 2.51636 4.66344 2.31411 5.02348C2.08969 5.42298 1.92833 6.04347 1.9297 6.5017C1.93092 6.91464 2.01103 7.19687 2.17124 7.76131C3.03221 10.7947 4.65668 13.6571 7.04466 16.045C9.43264 18.433 12.295 20.0575 15.3284 20.9185C15.8928 21.0787 16.1751 21.1588 16.588 21.16C17.0462 21.1614 17.6667 21 18.0662 20.7756C18.4263 20.5733 18.6911 20.3085 19.2207 19.7789L19.3783 19.6213C19.9098 19.0898 20.1755 18.8241 20.3198 18.5387C20.6069 17.9712 20.6069 17.3009 20.3198 16.7333C20.1755 16.448 19.9098 16.1822 19.3783 15.6508L19.1835 15.4559C18.8339 15.1063 18.6591 14.9315 18.4833 14.8172C17.8204 14.3862 16.9658 14.3862 16.3029 14.8172C16.1271 14.9315 15.9523 15.1063 15.6027 15.4559C15.4884 15.5702 15.4313 15.6274 15.3644 15.6752C15.127 15.8453 14.7828 15.904 14.5024 15.8222C14.4235 15.7992 14.3612 15.7693 14.2365 15.7094C12.7869 15.0134 11.4282 14.0646 10.2266 12.8631Z" stroke="#BD00FF" stroke-width="2" stroke-linecap="round" stroke-linejoin="round"/>
    </svg>`

    const browsing = `<svg style="align:center;position:relative;top:6px;margin-left:4px;" width="18px" height="18px" viewBox="0 0 24 24" fill="none" xmlns="http://www.w3.org/2000/svg">
    <path d="M19 19L14.65 14.65M9 4C11.7614 4 14 6.23858 14 9M17 9C17 13.4183 13.4183 17 9 17C4.58172 17 1 13.4183 1 9C1 4.58172 4.58172 1 9 1C13.4183 1 17 4.58172 17 9Z" stroke="#BD00FF" stroke-width="2" stroke-linecap="round" stroke-linejoin="round"/>
    </svg>`

    p.showButtons({
        buttons:[
            {label:`Talk to sales`, html:`Talk to sales ${sales}`},
            {label:`Just browsing`, html:`Just browsing ${browsing}`},
        ],
        force: true
    });
});

intent("Talk to sales", p => {
    p.play("Awesome, I just need to confirm some information first...");
 });

intent("Just browsing", p => {
    p.play("What would you like me to do?");
});