Use buttons in the AI chat
To make interactions more efficient, you can use buttons to the Alan AI Chat. Buttons provide clear and structured options for users and make the conversation more engaging and dynamic.
In this tutorial, we will add three buttons with predefined options that will be displayed when the user opens the Alan AI Chat:
The first button will take the user to a specific webpage.
The second button will display a message with helpful links.
The third button will provide a predefined response to the user.
What you will learn
How to use buttons in the AI chat
How to navigate between pages in the AI chat
What you will need
To go through this tutorial, make sure you have completed the following tutorial: Create an AI chat for a website.
Note
The buttons syntax differs between Alan AI runtime versions. This tutorial provides the button syntax for SLU 4.x. To use buttons with earlier SLU versions, see Chat buttons.
Step 1. Add buttons to the AI chat
To the dialog script in your project, add the following code. Here, we are using the showButtons() function to display buttons in the chat:
onCreateUser(p => {
    // Greeting
    const greetingImage = "https://img.freepik.com/premium-vector/education-badge-logo-design-university-high-school-emblem-vector-logo-template_441059-534.jpg?w=2000";
    const greetingTitle = "Welcome to Our University!";
    const greetingText = "I am your Admission AI Assistant! Feel free to ask me any questions regarding: \n - Admission process \n - Scholarships \n - Student life";
    const img = `<img style="display: block;margin-bottom: 20px; height:150px" src="${greetingImage}"/>`;
    const title = `<div style="margin-bottom: 10px;font-weight: 700;font-size: 20px;">${greetingTitle}</div>`;
    p.play(`${img}${title}${greetingText}`, opts({ force: true, markdown: true, audio: false, greeting: true}));

    // Buttons
    p.showButtons({
        buttons:[
            {label:'I\'m transfer student'},
            {label:'I\'m international student'},
            {label:'I\'m just browsing'}
        ],
        force: true
    });
});
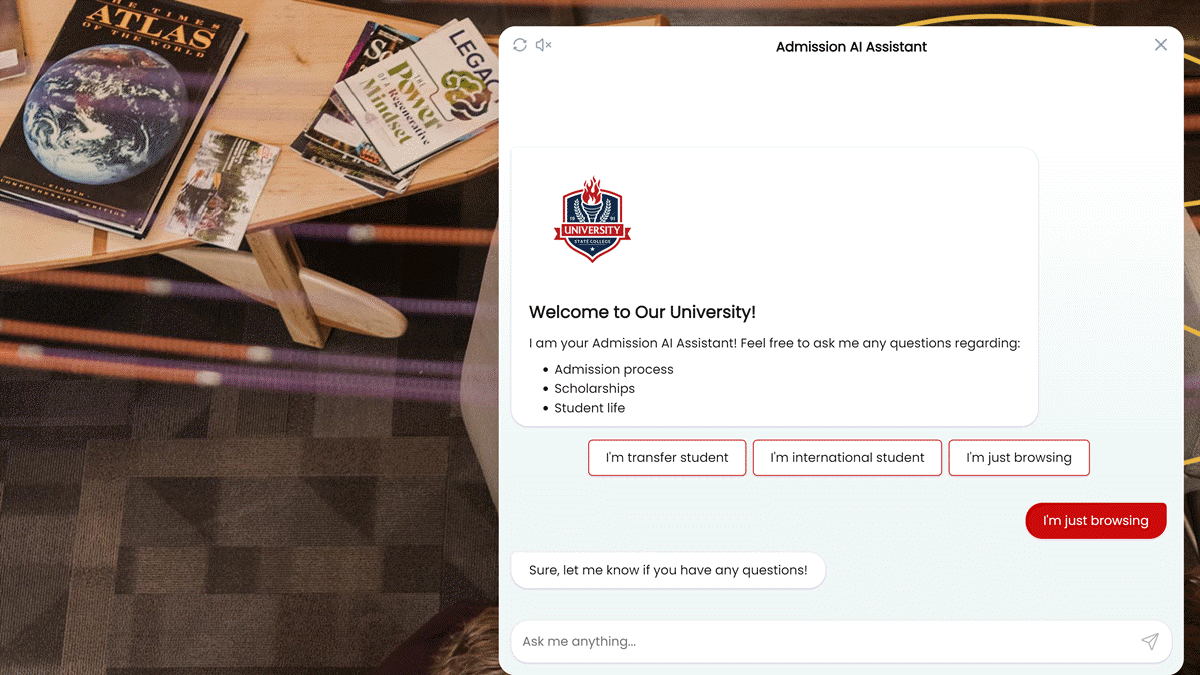
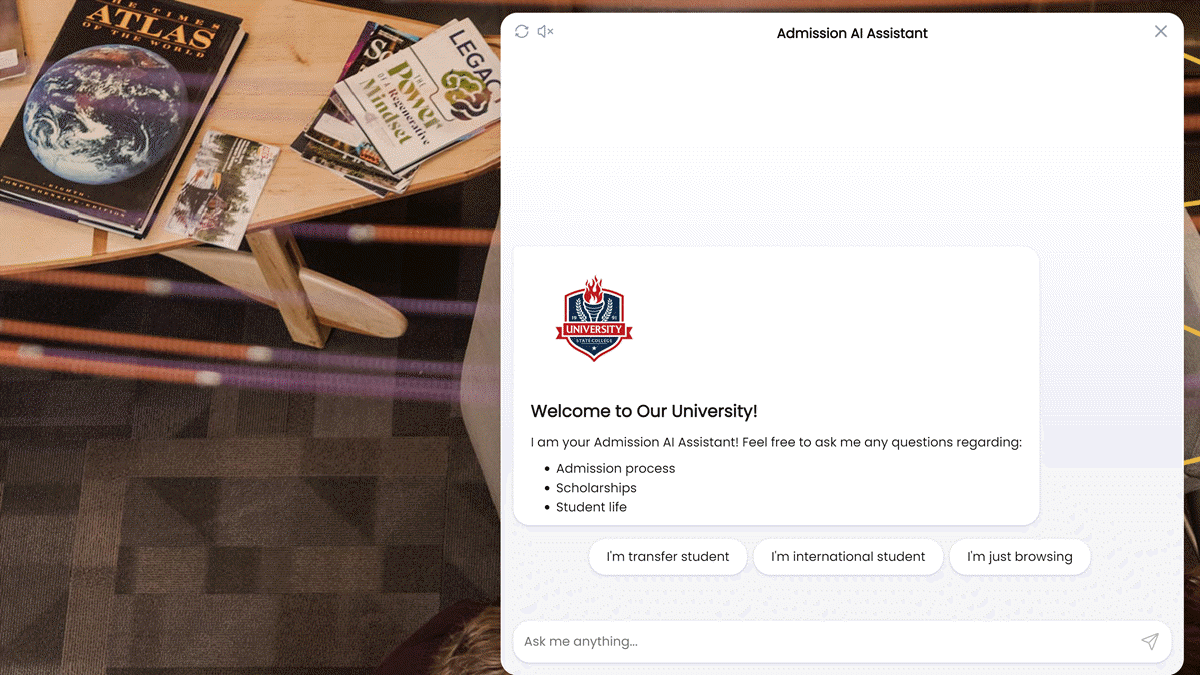
Now, when you open the Alan AI Chat, a greeting with three buttons - I'm transfer student, I'm international student and Just browsing - will pop up:
Step 2. Invoke intents with buttons
When a button in the chat is clicked, Alan AI can perform the following actions:
First, let us link the I'm just browsing button to an intent in the dialog script and provide a response when the user clicks this button. To do this, to the dialog script, add the following intent:
onCreateUser(p => {
    // Greeting
    const greetingImage = "https://img.freepik.com/premium-vector/education-badge-logo-design-university-high-school-emblem-vector-logo-template_441059-534.jpg?w=2000";
    const greetingTitle = "Welcome to Our University!";
    const greetingText = "I am your Admission AI Assistant! Feel free to ask me any questions regarding: \n - Admission process \n - Scholarships \n - Student life";
    const img = `<img style="display: block;margin-bottom: 20px; height:150px" src="${greetingImage}"/>`;
    const title = `<div style="margin-bottom: 10px;font-weight: 700;font-size: 20px;">${greetingTitle}</div>`;
    p.play(`${img}${title}${greetingText}`, opts({ force: true, markdown: true, audio: false, greeting: true}));

    // Buttons
    p.showButtons({
        buttons:[
            {label:'I\'m transfer student'},
            {label:'I\'m international student'},
            {label:'I\'m just browsing'}
        ],
        force: true
    });
});

// Response for the Just browsing button
intent("I'm just browsing", p => {
   p.play("Sure, let me know if you have any questions!");
});
Now, when the user clicks I'm just browsing, the AI assistant will respond: Sure, let me know if you have any questions!
Step 3. Call project API methods with buttons
When the user clicks the I'm transfer student button, let us take the user to the page providing admission information to transfer students. To do this, we will use a project API method.
In the buttons block, update the code for the
I'm transfer studentbutton to call thegoToTransfer()method, pass the student type with it and add the code for thegoToTransfer()method:Dialog script¶onCreateUser(p => { const greetingImage = "https://img.freepik.com/premium-vector/education-badge-logo-design-university-high-school-emblem-vector-logo-template_441059-534.jpg?w=2000"; const greetingTitle = "Welcome to Our University!"; const greetingText = "I am your Admission AI Assistant! Feel free to ask me any questions regarding: \n - Admission process \n - Scholarships \n - Student life"; const img = `<img style="display: block;margin-bottom: 20px; height:150px" src="${greetingImage}"/>`; const title = `<div style="margin-bottom: 10px;font-weight: 700;font-size: 20px;">${greetingTitle}</div>`; p.play(`${img}${title}${greetingText}`, opts({ force: true, markdown: true, audio: false, greeting: true})); // Buttons p.showButtons({ buttons:[ {label:'I\'m transfer student', callProjectApi: {method:'goToTransfer', data:{type:'transfer'}}}, {label:'I\'m international student'}, {label:'I\'m just browsing'} ], force: true }); }); // Response for the Just browsing button intent("I'm just browsing", p => { p.play("Sure, let me know if you have any questions!"); }); // Project API method to navigate to a page projectAPI.goToTransfer = function(p, param, callback) { console.log(param.type); p.play({command: "load-page", url: "https://www.iastate.edu/admission-and-aid/admissions/transfer-students"}, opts({force:true})); p.play("Great, let your adventure begin"); callback(); };
Note
To trigger a command from the Alan AI Chat, make sure you add the
force:trueoption to the command. In the opposite case, the command will not be executed. For details, see Specifying play options.In the webpage, update the onCommand handler to show the specified page when the
load-pagecommand is received:Client app¶<script> var alanBtnInstance = alanBtn({ key: "YOUR-ALAN-SDK-KEY-HERE", onCommand: function (commandData) { if (commandData.command === "load-page") { window.location.href = commandData.url; } }, rootEl: document.getElementById("alan-btn"), }); </script>
Now, when the user clicks I'm transfer student, the following actions take place:
The data passed with the method is written to Alan AI Studio logs.
The
load-pagecommand with the URL of the page to be open is sent to Alan AI and the page is open.The AI assistant plays a confirmation to the user.
Step 4. Set the visual state with buttons
When the user clicks the I'm international student button, let’s set the visual state and display a list of helpful links to the user.
In the buttons block, update the code for the
I'm international studentbutton to set the visual state totype:international:Dialog script¶onCreateUser(p => { const greetingImage = "https://img.freepik.com/premium-vector/education-badge-logo-design-university-high-school-emblem-vector-logo-template_441059-534.jpg?w=2000"; const greetingTitle = "Welcome to Our University!"; const greetingText = "I am your Admission AI Assistant! Feel free to ask me any questions regarding: \n - Admission process \n - Scholarships \n - Student life"; const img = `<img style="display: block;margin-bottom: 20px; height:150px" src="${greetingImage}"/>`; const title = `<div style="margin-bottom: 10px;font-weight: 700;font-size: 20px;">${greetingTitle}</div>`; p.play(`${img}${title}${greetingText}`, opts({ force: true, markdown: true, audio: false, greeting: true})); // Buttons p.showButtons({ buttons:[ {label:'I\'m transfer student', callProjectApi: {method:'goToTransfer', data:{type:'transfer'}}}, {label:'I\'m international student', setVisualState: {type: "international"}}, {label:'I\'m just browsing'} ], force: true }); }); // Response for the Just browsing button intent("I'm just browsing", p => { p.play("Sure, let me know if you have any questions!"); }); // Project API method to navigate to a page projectAPI.goToTransfer = function(p, param, callback) { console.log(param.type); p.play({command: "load-page", url: "https://www.iastate.edu/admission-and-aid/admissions/transfer-students"}, opts({force:true})); p.play("Great, let your adventure begin"); callback(); };
To the dialog script, add the code to display a message when the visual state is set to
type:international:Dialog script¶onCreateUser(p => { const greetingImage = "https://img.freepik.com/premium-vector/education-badge-logo-design-university-high-school-emblem-vector-logo-template_441059-534.jpg?w=2000"; const greetingTitle = "Welcome to Our University!"; const greetingText = "I am your Admission AI Assistant! Feel free to ask me any questions regarding: \n - Admission process \n - Scholarships \n - Student life"; const img = `<img style="display: block;margin-bottom: 20px; height:150px" src="${greetingImage}"/>`; const title = `<div style="margin-bottom: 10px;font-weight: 700;font-size: 20px;">${greetingTitle}</div>`; p.play(`${img}${title}${greetingText}`, opts({ force: true, markdown: true, audio: false, greeting: true})); // Buttons p.showButtons({ buttons:[ {label:'I\'m transfer student', callProjectApi: {method:'goToTransfer', data:{type:'transfer'}}}, {label:'I\'m international student', setVisualState: {type: "international"}}, {label:'I\'m just browsing'} ], force: true }); }); // Response for the Just browsing button intent("I'm just browsing", p => { p.play("Sure, let me know if you have any questions!"); }); // Project API method to navigate to a page projectAPI.goToTransfer = function(p, param, callback) { console.log(param.type); p.play({command: "load-page", url: "https://www.iastate.edu/admission-and-aid/admissions/transfer-students"}, opts({force:true})); p.play("Great, let your adventure begin"); callback(); }; // Visual state is set onVisualState((p, s) => { console.log(JSON.stringify(s)); if (s.type === "international") { p.play(`Thank you for considering our adventure! Here are some links to get started: \n - [Virtual tour](https://www.youvisit.com/tour/iastate) \n - [Requirements](https://www.iastate.edu/admission-and-aid/admissions/international-students)`, opts({markdown:true})); } });
Now, when the user clicks I'm international student, the visual state is set to type:international and Alan AI displays a message with helpful links for international students.
Step 5. Customize buttons
Finally, let us customize the button design to match the style of the webpage.
At the top of the code editor, click Integrations.
To the right of Text chat, click Change.
Scroll the options down to the Buttons section and update the button look and feel: font, color, position in the chat and so on.
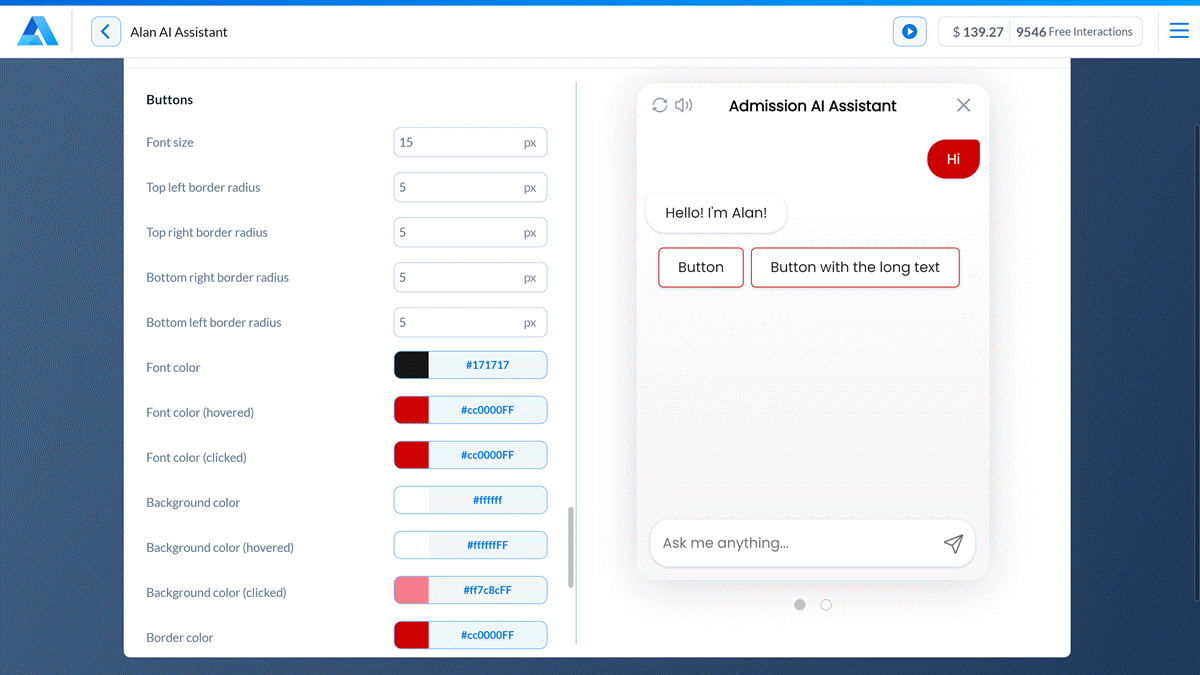
Refresh the webpage with the Alan AI Chat and make sure the new style is applied: