Send emails from the AI chat
You can configure the Alan AI Chat to send email messages directly from the chat window. This scenario can be helpful if you need to streamline repetitive communication tasks and boost efficiency in service and lead generation.
In this tutorial, we will add the Contact us button to the chat. When the user clicks this button, we will collect their contact information and request and send it by email to a representative responsible for handling incoming requests.
What you will learn
How to use send emails from the AI chat
How to integrate Alan AI with the SMTP server over API
What you will need
To go through this tutorial, make sure you have completed the following tutorial: Create an AI chat for a website.
Step 1. Add buttons to the AI chat
First, we need to add the Contact us button to the chat. To the dialog script in Alan AI Studio, add the following code:
onCreateUser(p => {
    // Greeting
    const greetingImage = "https://img.freepik.com/premium-vector/education-badge-logo-design-university-high-school-emblem-vector-logo-template_441059-534.jpg?w=2000";
    const greetingTitle = "Welcome to Our University!";
    const greetingText = "I am your Admission AI Assistant! Feel free to ask me any questions regarding: \n - Admission process \n - Scholarships \n - Student life";
    const img = `<img style="display: block;margin-bottom: 20px; height:150px" src="${greetingImage}"/>`;
    const title = `<div style="margin-bottom: 10px;font-weight: 700;font-size: 20px;">${greetingTitle}</div>`;
    p.play(`${img}${title}${greetingText}`, opts({ force: true, markdown: true, audio: false, greeting: true}));

    // Buttons
    p.showButtons({
        buttons:[
            {label:'Contact us'},
            {label:'I\'m just browsing'}
        ],
        force: true
    });
});
Now, when you open the Alan AI Chat, a greeting with two buttons - Contact us and I'm just browsing - will pop up:

Step 2. Capture contact information and user request
To the dialog script in Alan AI Studio, add the code to capture the following data: email address and user request:
intent("Contact us", async p => {
    p.play("I'd be happy to help! May I have your email address, please?");

    // Capturing an email address
    let userEmail = await p.then(getEmail);

    // Capturing a message
    let userMessage = await p.then(getMessage);
});

let getEmail = context((p) => {
     intent(`(My email is|It is)- $(EMAIL: anna.smith@gmail.com, james@yahoo.com...)`, p => {
         p.play("Now, please enter your question or request");
         p.resolve(p.EMAIL.value);
     });

     fallback("Please provide a valid email");
});

let getMessage = context((p) => {
    intent('(It is-) $(MESSAGE: free form text...)', p => {
        p.play(`Thank you! We will process your request and get back to you as soon as we can.`);
        p.resolve(p.MESSAGE.value);
    });
});

intent("I'm just browsing", p => {
    p.play("Sure, let me know if you have any questions!");
});
Here, when the user clicks the Contact us button, Alan AI sequentially activates the following contexts:
getEmailto get the user email. To capture the email value, we are using RegEx matching an email address in the slot.getMessageto get the user request. To capture the message, we are using greedy RegEx in the slot.
Step 3. Route outgoing messages
To send emails from the Alan AI Chat, you need to set up an SMTP server or use a third-party SMTP relay service. For this tutorial, we will be using Elastic Email.
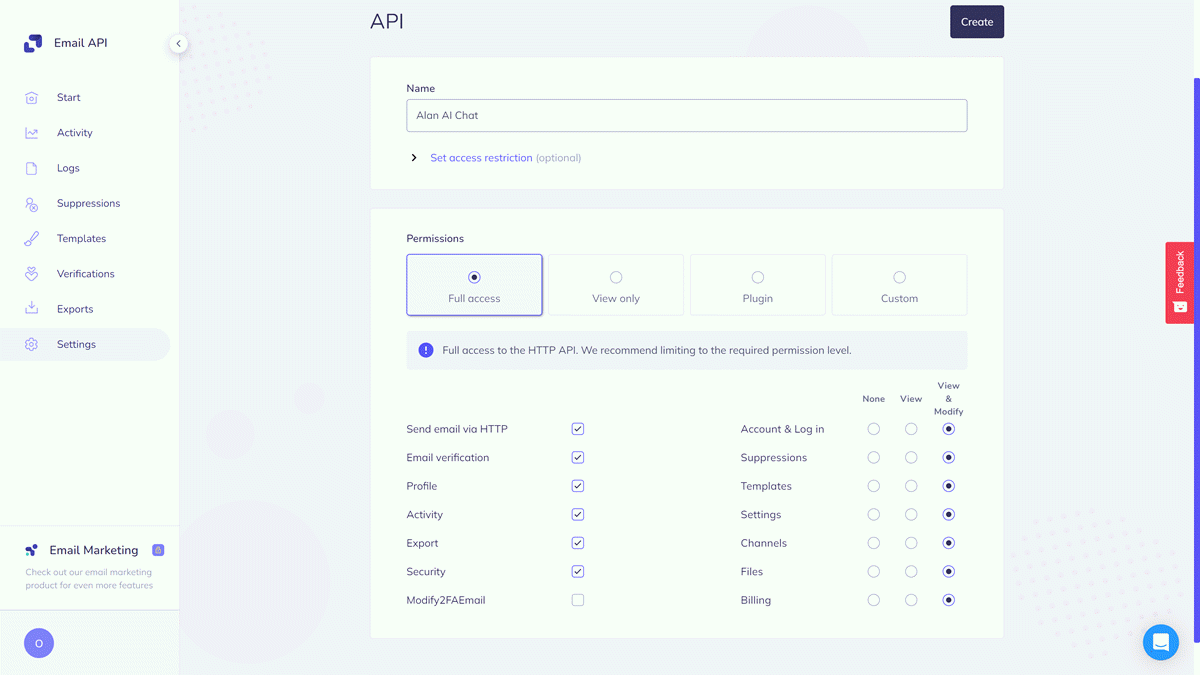
Let’s create an account for Elastic Email and get an API key:
Sign up to https://app.elasticemail.com/ and create an account here.
In the left menu, select Settings.
In the API section, click Create additional API key.
Enter a name for the API key and set permissions to Full access.
In the top right corner, click Create. Copy the displayed API key and save it for later.
Step 4. Send emails from the dialog script
Now, we can send the data we collect from the user via email using the Elastic Email API.
To the dialog script, add the
sendEmail()function:Dialog script¶const apiKey = "YOUR-API-KEY"; const from = "your-email@company.com"; const sendEmail = async (to, subject, text) => { try { const response = await api.axios({ url: `https://api.elasticemail.com/v2/email/send?apikey=${apiKey}&from=${from}&to=${to}&subject=${subject}&bodyHtml=${text}&isTransactional=True`, method: "POST", }); console.log(response.data); } catch(error) { console.error(JSON.stringify(error)); } }
Here, we are using the axios built-in library to send an email using the Elastic Email API. Do not forget to replace the
apiKeyvalue with the API key obtained at the previous step and thenamevalue with the user name of your Elastic Email account.Update the
Contact usintent to call thesendEmail()function and pass the collected contact information and message to it:Dialog script¶intent("Contact us", async p => { // Capturing a name p.play("I'd be happy to help! May I have your email address, please?"); // Capturing an email address let userEmail = await p.then(getEmail); // Capturing a message let userMessage = await p.then(getMessage); // Sending an email let subject = "Request from " + userEmail; sendEmail(from, subject, userMessage); });
You can test it: when you open the Alan AI Chat, click Contact us and provide the requested information. Then make sure the email is sent to the address you have specified in the to parameter.
Note
Depending on your filters, emails may land in the Spam folders.